Below you’ll find documentation for our WordPress system. If you need any more information, check the WordPress Codex, or email Veronica Armour at veronica.armour@shu.edu.
WordPress ePortfolios
A Quick Start Guide
by the Teaching Learning & Technology Center
Congratulations, you are a proud new ePortfolio owner!
More detailed information can be found in the WordPress Codex.
Ready? Let’s get started!
Logging In To Your ePortfolio
The first thing you need to do is log in to your ePortfolio. Go to the homepage at http://eportfolio.shu.edu. On the right sidebar you will find a login box. Enter in your PirateNet username and password to login.

The WordPress Dashboard
The WordPress Dashboard is your navigation system. There are multiple buttons that you will take you to the different setting and configuration screens. Over time you will learn all of them and what they do. It may seem like a lot all at once, so we’ll go through the most important buttons one at a time.
New to version 3.4.2 is the Quick Bar. This bar appears the top of any eportfolio.shu.edu site when you are logged in.
![]()
The most commonly used features — adding a post or page, managing comments, editing the current page — are all available from here with a single click.
Editing Your Pages
Often times you’ll want to go back and edit a page that you’ve already published, or continue to work on a draft. To do this, just go back to the “Pages” page (from the Dashboard sidebar, go to Posts). Then click on the title of the page you want to edit.

Editing and adding functionality is easy with WordPress. You can use all of the functions you are used to using in Microsoft Word (lists, hyperlinks, bold, italic, blockquote, etc…). For more info on this refer to the WordPress Codex.
Adding Media to your blog
WordPress’ built-in functions make it simple to add images, sound and video to your posts. Adding media also enhances your content, breaking up the solid blocks of words and adding color to better illustrate your content, as well as engage your readers.
- Position your cursor in the point in your page where you want your media to appear. WordPress will automatically insert your new media where your cursor currently is, so make sure it is not in the middle of a word or a sentence.
- On the Upload/Insert section, click on the words Upload/Insert or on the add media button directly to the right.
- Click the “select files” button, and select the image files from your machine. You can also Control+click to select multiple files at once.
- Next you’ll have the option to change the title, caption, description, alignment and size. Remember that the width of your blog post will typically be less than 500px. If you upload an image or video that is wider than this, it will almost certainly not fit. In this case you’ll want to click either “Medium” or “Large” size options and WordPress will resize it to fit into your theme. Try one of these options now so you can see the results.
- Click Insert into Post. Your new image will appear in the post body at the point your cursor was at.
- Remember to press Save Draft or Update after inserting your image to re-publish your changes.
If you ever need to edit any of these options, simply hover over the image and a button will popup that will open a settings window. For more info about this page and other image editing options, check out this link about using images in the WordPress Codex.
Adding other forms of media is done in the same way. Just click on the appropriate button (except video, which we deal with differently*) and it will insert a link into your blog post. The third button is for audio files, and the last is for other file types such as PDF or XLS.
Changing Your Theme
Don’t like how your page looks? Let’s learn how to change our theme.
- From the Dashboard sidebar, go to Appearance > Themes.
- You’ll see a list of all available themes. Click on the pictures to preview the theme applied to your site.
- When you’ve settled upon a theme you like, click Activate.
- View your page and you should see your new theme.
Important Tips
Organize Your Content
It’s very helpful to your reader when your content is organized in categories. This might not seem like a big deal now, but a year from now when your blog is full of content, it will be easier for your readers to find exactly what subject matter interests them.
The two best ways to do this are through categories and tags. The two are similar in nature, and the differences between them are subtle. WordPress has an in-depth explanation at the WordPress Codex.
Using Microsoft Word
Say you are preparing a blog page and you write up a draft in Microsoft Word. You go to copy and paste it into WordPress and all of a sudden your formatting is all over the place. What happened? Well, when you copy your content from a Word document and paste it into the WordPress interface, it doesn’t just add the text you selected. It also adds a large chunk of code that can mess up your blog’s formatting.
Normally, we frown upon using Word this way, as the best option is always to type your content into the WordPress editor directly. This is the only way to completely avoid any formatting issues.
But if you must use Word, make sure you turn on the ‘Paste from Word’ option. Follow these steps.
- Move your cursor to where you want your content to appear in your WordPress page.
- Activate the “Toolbar”. This is the sixth-from-the-last editing button. Pressing this button shows a second row of options for formatting your content.
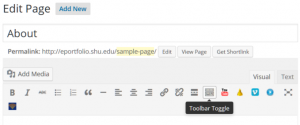
- In the middle of this new row is the “Paste as Text” button. Click it and you can toggle on and off the heavy formatting code that Word would ordinarily bring in. Press Insert and your content will appear where your cursor was positioned.
- Press Update / Publish to save your content.

*Video: We recommend you upload your video to YouTube. Once it’s uploaded and ready, copy the “share” URL (not the embed code) and paste it into your page on a line by itself. WordPress will handle formatting the viewer automatically.